I've seen an interesting static site use case come up a few times recently where someone wants to use a static generator along with an existing dynamic site. The idea is that they would generate certain resources statically at build-time of the dynamic site and then only rely on the dynamic runtime for pages that really need it. I've long suspected that Wyam would be great in this role, particularly for ASP.NET MVC sites given that it can read the same Razor layout files. I finally got motivated enough to give this a try and will detail how to do it in this blog post. It turns out it's not hard at all and works really well once you've gotten everything set up.
For the purpose of this post, we'll be modifying a stock ASP.NET MVC web site. Note that there are probably a dozen different ways you could accomplish this type of integration and what I'm describing here is just one of them. Since Wyam is essentially just a console application, any process by which you run Wyam before running the ASP.NET compiler should work. For example, you could use Cake to build your ASP.NET MVC site and instead of running Wyam as a pre-build event as described below, you'd run it via the Wyam Cake addin.
Install Wyam Into The Site
The first step is to get Wyam onto your system. Since we're already talking about a .NET project, let's go ahead and pull down the Wyam tools package from NuGet. It's just called "Wyam" and can be installed via the NuGet management UI or the Package Management Console. Note that the package is currently prerelease so you might have to turn on prerelease package searching in the NuGet UI to see it.
Since the package is a tools package, it'll unpack the Wyam CLI executable in the tools subfolder where NuGet installed the package. Generally, this will be something like packages/Wyam.0.13.5-beta/tools (from the root of your solution).
Add a Pre-Build Event
The next step is to add a pre-build event that runs Wyam every time the site is built. This is the glue that generates your static resources for inclusion by the ASP.NET compiler. Open up the project properties, go to the "Build Events" tab, and add the following pre-build event:
"$(SolutionDir)\packages\Wyam.0.13.5-beta\tools\wyam.exe" "$(SolutionDir)\config.wyam"
Make sure to match the Wyam package folder name to the version you actually pulled down. Note that this will also need to be updated if you update the package.
Note that you can also run this same command directly from your command line to test the Wyam generation. That will let you iterate a bit faster and give you a bit more visibility while you're setting everything up and troubleshooting over just running Wyam during the ASP.NET site build.
Add The Config File
Note that the build event above calls the Wyam executable and tells it to use the config.wyam configuration file found at the root of the Solution. Let's go ahead and create that file since the build event will look for it. It should look something like this:
#n -p Wyam.Markdown
#n -p Wyam.Yaml
#n -p Wyam.Razor

FileSystem.InputPaths.Add("ProjectName/Posts");
FileSystem.OutputPath = "ProjectName/Blog";

Pipelines.Add("Posts",
	// Read all Markdown files under the "Posts" directory
	ReadFiles("*.md"),
	// Load any frontmatter and parse it as YAML markup
	FrontMatter(Yaml()),
	// Render the Markdown content
	Markdown(),
	// Compile and render the page layout template
	Razor(),
	// Write the files as HTML
	WriteFiles(".html"),
	// Order the files by publish date
	OrderBy(@doc.Get<DateTime>("Published")).Descending()
);

Pipelines.Add("Index",
	// Read all non-layout Razor files under the "Posts" directory
	ReadFiles("**/{!_,}*.cshtml"),
	// Evaluate the Razor page(s)
	Razor(),
	// Write the file(s) as HTML
	WriteFiles(".html")
);
You can add it as a Solution item if you'd like to be able to edit it from Visual Studio, otherwise you can just edit it with a text editor. The pipeline in the example above will check for all Markdown files, process any YAML frontmatter they have, render them with the existing Razor layout files (more on this below), output them as static HTML files, and then order them by post date. A second pipeline will render Razor files (for example, the list the posts). Generally, any sort of Wyam configuration file you would normally use can also be used here.
The main thing to notice about the configuration file is that we're setting custom input and output folders. This lets us put the input Markdown files (and associated layouts for the static pages) right in our ASP.NET project in the Posts folder and will generate the static HTML files for inclusion in our site in the Blog folder.
A Note About Razor Layouts
One of the compelling reasons to generate static resources with Wyam inside your ASP.NET MVC site is that Wyam can make use of your existing Razor layout files...with some caveats. Mainly, you can't have any dynamic code in your layout. For example, things like the HTTP request context simply aren't available when generating pages statically. Also note that while the underlying Razor parser is very similar, Wyam Razor pages aren't quite the same as those in ASP.NET MVC. For example, many of the HTML helpers you might be used to aren't available. You may need to par down your top-level Razor layout to get it to work with Wyam.
If you do want your layout to have some dynamic code, one approach is to create a very simple outer layout and then two different inner layouts. One of the inner layouts can contain the dynamic code, HTML helpers, etc. that you have when compiling with ASP.NET MVC and should be used for your dynamic pages (probably specified by the ASP.NET MVC _ViewStart.cshtml file in your Views folder). The other inner layout can be used by your static pages and should go in the Posts folder that Wyam uses as input.
Input Files
I mentioned above that we'll pull the Markdown files from the Posts folder. Let's go ahead and make one that looks like this:
Title: First Post
Published: 8/10/2016
---
This is my first post!
Then go ahead and create a couple more. At build-time, these will get read and processed by Wyam and the resulting HTML files will be placed in the Blog folder.
You can also add the _ViewStart.cshtml and _Layout.cshtml for your static pages in this folder.
Note that any files in your Posts static input folder should have a Build Action of None if you include the file in your project. Also note that the static input files don't have to be included in your project, Wyam will pick them up either way.
Output Files
When Wyam is run, it will place the final static results in the Blog folder. To make sure these files get included in your ASP.NET MVC build, you'll need to add the following to your .csproj file for the project (unfortunatly, opening the .csproj file is the only way to add a wildcard pattern like this right now):
<Content Include="Blog\**\*.*" />
This will ensure that each build includes all of the output files from Wyam every time.
Putting It Together
So let's recap:
- Install the Wyam tools NuGet package
- Add a pre-build event
- Make sure Razor layouts will work
- Add your Markdown files
- Add a wildcard content item to the project
When you're done, you should have something that looks kind of like this:
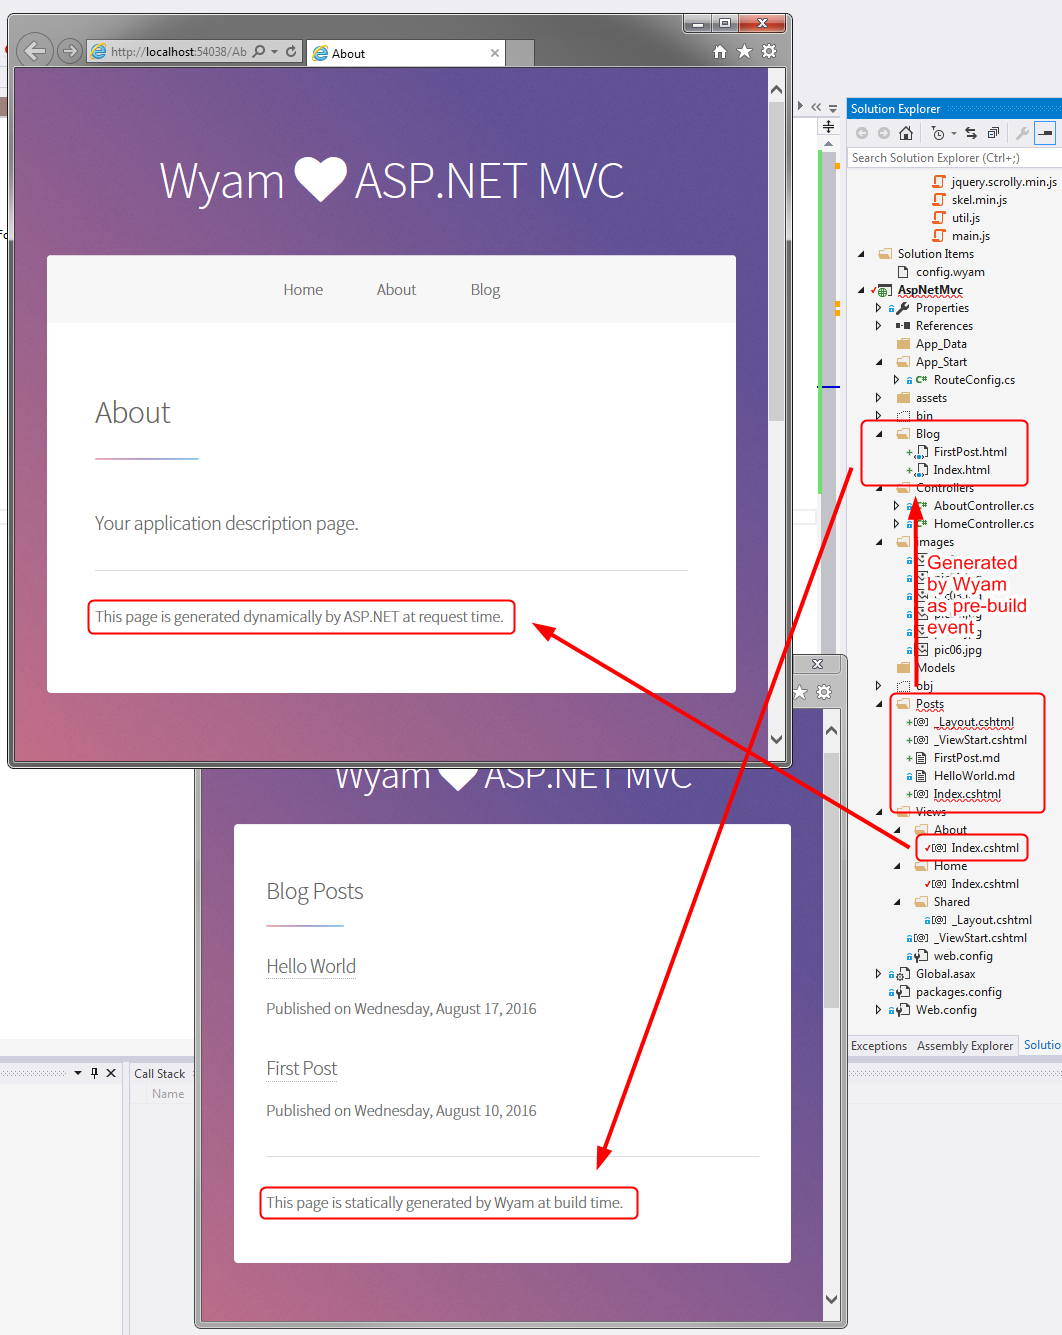
You can see all of this in action in the complete example at https://github.com/Wyamio/Wyam/tree/develop/examples/AspNetMvc.
If you have any questions, just let me know in the comments below.